Quantcast
Channel: McClurg's Home Remodeling Blog
Viewing all 283 articles
Browse latest View live

Space Saving Storage Solutions for Clothes, Linens and Kitchens

$
0
0

Are you looking for storage solutions? Is it time to “un-clutter” your closets? Clothes closets, linen closets, pantries and the cabinets where we keep cleaning supplies are areas of our homes that can quickly become disorganized and at times make it difficult to find the things we need when we need them. After you’ve cleared out all of the items you don’t use anymore, if you find you need more space or desire better organization, it may be time for a space saving storage solution.

1.    Reinvent the Clothes Closet

Many of us have used the standard closet in a home, the one with one rod and a shelf.  Often the storage space is wasted. Clothes of varying lengths are hung on a single rod and become jammed. Shoes are relegated to the floor and you have to get down on your hands and knees to sort through them when you need a pair. The shelf over the rod may be too high to reach and items get lost and dusty in the back. Consider some of these closet storage solutions:

  • Compartments. Closet inserts with adjustable shelves can help break up clutter. There are two types of closets, walk-in and reach-in. Compartments work well in both. Compartments provide space needed for storing items that can be folded like sweaters, jeans and knits. Smaller items-, purses, gloves and hats can be placed in baskets and stored in compartments as well. Compartments with narrow shelves or cubbies are ideal for storing shoes

closet storage system with shelves and rods

PinIt


  • Multiple rods. Double rods can be used to optimize the space used for hanging items in a closet. They are an efficient way to hang jackets, shirts, blouses, pants and skirts. Rods can be adjusted to hang longer items such as coats and dresses.

closet storage sytem with shelves drawers and rods

PinIt


  • Drawers. Storage drawers in a closet keep contents organized and out of sight. Deep drawers will hold sweaters, sweatshirts and knits. Smaller drawers can be used to store jewelry, belts or lingerie.
  • Closet accessories. Manufacturers of closet systems have recognized that functional closets need to include storage space for the small items that we use with our attire. “Must have” closet accessories include retractable racks for ties, belts, scarves and necklaces and shelf dividers to keep contents intact.

retractable belt rack for closets

PinIt


  • Hooks. Hooks can be used for many items. One of the most efficient ways to add hooks to a closet is to use a strip of double hooks for belts, purses and long necklaces that would become entangled in a drawer or jewelry box.
  • The back of a hinged door. There are many types of storage accessories that will fit on the back of a hinged door.  These include narrow racks, hooks, baskets, shoe hangers, clothes hangers and even hangers for ironing boards and irons that you might want to have on-hand to press clothes.

2.    Organize Linens

A linen closet in a bathroom or a hallway is a perfect place for storing towels, toiletries, sheets, and blankets. If you are considering a bathroom remodeling project and need extra storage space, even a small linen closet can be a big asset. 

bathroom linen closet

PinIt


3.    Un-jam the Kitchen Pantry

Storage space is always a priority in any kitchen. New storage systems for pantries have taken basic shelving to another level. Some of these systems are intended to be installed within a closet or directly on a wall. The amenities these systems offer include wine racks, drawers, dividers, pullout baskets, pullout shelves and edging to hold contents in place.

pantry storage system with accessories

PinIt


4.    Clean Out the Cleaning Supplies

Any home needs a place for mops, brooms, dusters and cleaning supplies.  There are accessories that can keep these items organized by hanging on the back of a door, wall or in a narrow broom closet.

Mop and broom organizer

PinIt


Storage Guide CTA


10 Awesome Basement Storage Ideas

$
0
0

Do you need more storage space to control the clutter in your home? You may find a solution to your storage problems in your basement. If you’re planning on remodeling your basement or renovating to meet your storage needs, here are 10 ideas for creating basement storage space:

1.    Storage Under the Stairs

The space near the stairs is a great place to store items. Build storage into the wall, or use graduated shelves to optimize storage. Narrow shelving can be mounted on landings to hold books or for decorative items.

Consider using the space under the stairs for storage. Small shelving units can be mounted under steps. Wire racks and baskets work well in small spaces. Hooks can be hung under stairs.

2.    Built-in Shelving

Basement remodels are often designed to accommodate activities. Often homeowners convert basements into game rooms or bars areas. Cabinets can hold glassware and spirits. Built-in shelving can optimize the space and either hide or display contents. Use cabinets around the perimeter for books and even built-in seating where items can be stored under the seat or in a storage bench.

Basement with Built in Shelving and File Cabinets

PinIt


3.    Extra Kitchen Storage

Many people find that there is never enough storage space in a kitchen, especially if you like to entertain. A basement can provide the space you need for all of those dishes, glassware, pots, pans and serving bowls and platters that you don’t use every day but are essential for feeding a crowd. Having an extra sink, stove and refrigerator also is a plus.

basement kitchen storage

PinIt


4.    Basement Closets

Basements often have alcove areas that can be framed as storage closets. Make the most of these “nooks and crannies”. Depending on the size, some of these alcoves can be converted into craft areas and may accommodate a narrow table or desk for sewing or working on craft projects. Add doors to contain the clutter of unfinished projects. Use the backside of a door for storage by adding hooks or narrow shelves.

Closets can be organized with shelving inserts to store infrequently used items such as Christmas decorations or holiday cookware and china. Be sure that shelves are deep enough to hold bins and boxes. Don’t forget to label containers.

Use your space wisely. Closets can be built in the corners of a basement or under stairs to keep the contents out of sight.

basement closets and concealed mechanicals

PinIt


5.    Laundry Room

If your laundry is located in your basement consider adding cabinets to store supplies. Be sure to install a closet rod for hanging clothes. Add a bulletin board, a great place for socks that get separated in the dryer. Tack the sock to the board until you can locate the match.

6.    Media Center

Big screen TVs, speakers, DVD players, cable boxes and stereos and their accessories (DVDs, CDs, computer games, etc.) all require space. Built-in media units are the best for storing electronics and hiding wires. Doors will protect and hide a TV when not in use. Pullout drawers can be used to keep small items and components organized and accessible.

basement built in entertainment center

PinIt


7.    Work Room

Create a work space in your basement by adding utility shelving. Shelves can be custom built  or free-standing to hold tools, materials and supplies.

8.    Walk-out Basement Exit

Add hooks to a wall for hanging coats, jackets and pet leashes near the exit and cubbies for shoes, hats and gloves. A storage bench placed near the door is also an asset to sit on when taking off footwear and for storing toys and games used outdoors.

9.    Toy Storage

Storage for children’s toys should be designed from the child’s perspective. Make it easy for children to access toys and put them away. Open shelving with bright baskets will make clean-up time more fun. Shelves should be hung low so a child does not need to stand on a stool or chair to reach them. If you provide a toy chest, be sure to use one with safety hinges or better yet, remove the lid.

basement childrens playroom

PinIt


10.    Wine Cellar

If you plan to store wine in your basement find a space where light and heat will not compromise the wine as it ages. Find a place where the cool temperature of a basement wall or floor can be transferred to the wine bottles. Select strong shelving to hold the bottles. Shelvies should be 12 inches deep for storing bottles. Secure shelves to the wall so they will not tip when wine bottles are added. You can create a microclimate by using a heavy curtain around the storage area to block light out and keep temperatures cool.

Editor’s note: This post was originally published on July 19, 2011 and has been updated to provide information about the latest trends and design ideas.

Storage Guide CTA

Interior Room Colors Inspired By Fall

$
0
0

Fall is a time for thinking about home improvement projects. Many Central New Yorkers look for inspiration at the Parade of Homes. The Parade of Homes is sponsored by the Home Builders & Remodelers Association of CNY and we’re proud to be a member.  

After visiting the event, often homeowners consider products, designs and paint colors that they would like for their own homes. Paint can update the appearance and style of a home, so people are interested in the current colors used. If painting a room or two is on your “to do” list this fall, here are some of the colors that interior designers used in the Parade of Homes and a few of our favorites from the Benjamin Moore palette.

Interior Trims

This year one of the most notable trends at the Parade of Homes was white interior trim. White moldings, doors and window trim can unify the rooms of a home and highlight architectural features. Our go-to paint colors for interior trims are:

Decorators White CC 20Decorators White CC 20. Many of the interior designers at the Parade of Homes featured gray, green and blue paint colors in kitchens and other rooms. “Decorators White” has a gray undertone that complements a range of paint colors, especially grays, blues, greens and yellows.
Super White PM 1Super White PM-1. White paint will reflect color and light in a room. If you’re concerned about undertones, “Super White” is a clear, simple color for trims with no tints. It augments any wall color and is virtually foolproof.


Hot Shades of Gray

Gray was the dominant wall color used by designers at the “Parade of Homes”. Some of the homes had a monochromatic palette featuring gray wall colors in various values — light, medium and dark tones. Gray was also used on ceilings. The colors featured include:

Wickham Gray HC 171Wickham Gray HC 171. “Wickham Gray” is a neutral interior color and a warm shade mid-tone gray. It was used on walls, ceilings and in hallways.
Chelsea Gray HC 168Chelsea Gray HC 168. This darker shade of gray was used in an office, half bath, master bedroom and as an accent color on a coffered ceiling and on walls behind white shelves in a family room. It has a brown undertone that warms it in a room. Gold and cream complement this color in a home.
Stone 2112 40Stone 2112-40. “Stone” is a stunning shade of gray with a red undertone that made it look as though there was a hint of deep purple in the color. It was used in a half bath.


Gold and Tan

Gold, brown, orange and red are the colors of fall. This year, designers featured these colors in several homes. These are some of our favorites:

Shelburne Buff HC 28Shelburne Buff HC 28. This classic shade of gold was used in a kitchen, banquette and dining area of a home with an open concept floor plan.  It brightened dark counters in the kitchen and complemented the white cabinetry and dark wood accent furniture.
Clarksville Gray HC 102Clarksville Gray HC-102. Paint companies come up with unusual names for colors, this is one of them. “Clarksville Gray” is a mid-tone brown with an olive undertone. It was used in a master bedroom and bath. Benjamin Moore paired it with a color named “Onondaga Clay 1205”. Reds and yellows are good accent colors to use with “Clarksville Gray”.
Wicker Basket CSP 255Wicker Basket CSP-255. “Wicker Basket” is a mid-tone tan with a red undertone that makes it a “taupe” shade of brown. It was selected for a hallway and guest bedroom in a home that also featured “Clarksville Gray” and “Shelburne Buff”.


Pops of Color

Bright colors were used throughout the homes showcased in wall art, furnishings, children’s bedrooms and baths and in family areas. Here are four dynamic wall colors featured:

Pink Flamingo CSP 1175Pink Flamingo CSP-1175. This cheerful shade of coral was used for a teenage girl’s bedroom. It was paired with white trim and white built-in shelving. Accent colors in the room were apple green and oranges.
Central Park 431Central Park 431. A child’s room was painted in this bright cheerful green. White trims and furniture and accents of teal and pink made this room a place that a young girl would love.
Calming Aloe 533Calming Aloe 533. This paint color is aptly named. It is a soothing shade of green that was used for a children’s bathroom where a colorful mural was painted. It is also a color that looks great with teal and beige in a room.
Mystic Lake CSP 745Mystic Lake CPS-745. A family room in an open-concept home was painted in this blue-gray color.  There were dark wood, red and gold furnishings in the room and a gray natural floor-to-ceiling fireplace that was the focal point.


If you attended the Parade of Homes this year, what ideas did you find for your home?

Be sure to check out our article "The Hottest Interior Paint Colors for 2013". It's one of our most popular blog articles.

Free Remodeling Seminar

Project of the Month: A Minor Kitchen Remodel Transforms a Home

$
0
0

It’s amazing how new countertops, backsplash and appliances along with some paint and a little tweaking can update a kitchen. The Fayetteville kitchen featured in this month’s “Project of the Month” demonstrates how a minor kitchen remodel can really transform the look and feel of a home. It’s hard to believe that this is the same kitchen. Minor changes transformed a time worn room into a stunning kitchen that looks as though it came out of the pages of a home décor magazine.

fayetteville minor kitchen remodel

PinIt


Lead Carpenter:Jeff Loefstedt

Objectives 

The homeowners were content with the floor plan of their kitchen. There was a sink area with a window that provided a view of the yard. The location of the sink and appliances made preparing meals easy and there was an island for food prep and informal dining. The kitchen cabinets were still in very good condition. They had done a few improvements over the years. too. There was a classic ceramic tile floor and a stylish efficient light fixture.

However, the kitchen looked old. The cabinet finish, soffits, aged appliances, dark metal hardware and countertops were at least thirty years behind today’s trends and efficiencies. 

The homeowners’ objectives were to:

  • Work within the existing footprint of the kitchen.
  • Replace the appliances with energy efficient stainless steel finish models.
  • Keep the cabinets, flooring, island, island light fixture and faucet.
  • Replace the countertops and backsplash.
  • Replace the cast-iron top mount sink with an easy care under-mount stainless steel sink
  • Create a more open, unified look in the in the room.

Kitchen Before Collage


Challenges

Salvaging and blending the old with the new.

The cabinets were in need of refurbishing. Countertops and soffits were to be removed without damaging the cabinets. The floor that looked out of place in the old kitchen became an important element in the remodel. Special care was taken during the remodel to protect the flooring.  The sink faucet and light fixture over the island were removed and re-used.

Solutions

The design plan to renovate this kitchen included the following:

1.    Updating the existing cabinets.

Soffits above the cabinets were removed to open up the room visually. Crown cabinet molding from Bishop Cabinets was installed directly onto the cabinets to give them an updated look. The old maple finish was painted white. The cabinets were re-hinged and new brushed nickel hardware was added. The window over the sink was updated with accent molding to make it appear new and to complement the restyled and painted cabinets. The white cabinetry reflects light to brighten the room.

2.    Replacing the countertops.

The old granite perimeter countertop and the butcher block countertop on the island were replaced with black granite counter surfaces, which unified the look of the room. A new stainless steel double bowl sink was mounted under the counter. The impact was significant.

3.    Replacing the backsplash.

The homeowners liked the look of mosaic tile but small tiles can be hard to clean behind a cooktop due to small grout lines that can be soiled with spatters when cooking food. The solution was to use 2-inch mosaic tiles in a grid pattern behind the sinks and adjacent counter and 2-by-6 inch classic white subway tile behind the cooktop. The white subway tile complements both the cabinetry and mosaic tile and provides a focal point in the room.

white kitchen with black countertop and mosaic tile backsplash

PinIt


4.    Replacing appliances. 

The homeowners provided the new appliances for this remodel. They chose stainless steel appliances with dimensions that would fit within the existing cabinet openings.

white kitchen with stainless steel appliances

PinIt


5.    Improving lighting. 

The kitchen window provided a source of natural light and the fixture over the island is timeless so it remained in place. A new pendant light was added over the sink and outlets and switches were covered with metallic plates.

6.    Painting cabinets, walls and woodwork.

Paint can work wonders in a home. The white painted cabinets and woodwork brighten the space. A bright, cheerful yellow was selected for the walls and accentuates the main elements of the kitchen – cabinets, tile, flooring, countertops, backsplash, appliances and wood trim.

white painted kitchen cabinets

PinIt


Download our FREE Kitchen Remodeling

Kitchen Backsplash Tile: 5 Layout and Design Options

$
0
0

Kitchen backsplash tile is an essential element in the design of any kitchen. Its function is to provide a surface for water and cooking spatters that can be cleaned easily.  A tile backsplash is often a focal point in a kitchen that adds aesthetic appeal to the room

Kitchen backsplash tile should complement counters, cabinets, appliances and flooring. When selecting tile it helps to have samples of the counter surface and cabinets on hand to match. It is also helpful to work with a kitchen or tile design professional because the placement of cabinets, the sink and appliances will be important to the design.

In tile design there are two components to consider: field tile and accent tile. Field tile is the predominate tile in the design. Accent tile includes contrast tile used within a field tile pattern and border tile. Both types of accent tile add interest to the design.

Field tile can come in mesh backed sheets to simplify layout or individual tiles that can be set in a variety of patterns. Small tiles, two inches or less, often come in 12-inch square sheets. Common sizes of individual wall tiles used for backsplashes are 4-by-4 inch squares, 6-by-6 inch squares and 3-by-6 inch rectangular tile. For these types of tiles there are five basic wall tile patterns:

1.    Grid Pattern

A grid pattern is made up of square tile laid in a line. The tile can be uniform or mixed in color but the pattern is linear. Each tile on a wall is lined up with the next, horizontally and vertically.

Grid Pattern Backsplash Tile with Glass Mosaic Border

Pin It


2.    Checkerboard Pattern

Two square colored tiles can be used alternately to create a checked pattern. A checkerboard pattern is a variation of a grid.

3.    Diamond Pattern

A diamond pattern is created by laying out square tile on a diagonal.

Hand Painted Ceramic Kitchen Tile in Diamond Pattern

Pin It


4.    Herringbone Pattern

Rectangular tile placed in a v-shape creates a herringbone style design. Wall tile and floor in a herringbone pattern is often sold in mesh-backed 12-by-12 inch sheets ready to set.

5.    Brick or Subway Pattern

A brick pattern wall tile was used in the early 1900s to decorate the walls of subway stations in New York and came to be known as “subway tile”. Subway tile is a 3-by-6 inch rectangular tile that is commonly used for kitchen backsplashes because the typical height of a backsplash under cabinets is 18 inches. A subway pattern is an off-set layout of the tile.

Cambria Kitchen Countertop and Glaze Porcelain Subway Tile

Pin It


Tile patterns can also be laid in combination to create a stunning effect in a kitchen.

Ceramic Kitchen Backsplash Tile Square and Diamond Combination

Pin It


One of today’s most popular trends in backsplash tile design is the use of glass mosaic tile either as a border or as a field tile. Glass mosaic tile glistens in a kitchen. It can be colorful or lustrous and is always eye-catching.

Glass Kitchen Backsplash Tile

Pin It


Download our FREE Kitchen Remodeling Guide

8 Awesome Design Ideas for Half Baths

$
0
0

A half bathroom can be one of the easiest rooms in your home to update. These spaces are often used by guests, so give the room some “pizzazz” and make it a showplace in your home. Use your imagination and get creative in the way you decorate your half bath.

Here are eight design ideas for transforming your half bath:

1.    Update the walls

Half bathrooms contain a vanity sink and toilet but no shower or tub to create steam and condensation. You can use wallpaper or faux finishes without worrying about pealing or color changes due to exposure to moisture. Wall coverings come in a variety of textures or even fabrics to create instant elegance in a guest bathroom. Use jewel-tone paint colors like deep blues and rich reds, russets or purples or earth colors to add interest. The notion of “using light colors to make the room feel bigger” really doesn’t apply to these spaces. Rich colors and textures create a “jewel box” impression that will be pleasing to your guests.

Half Bath with Tile and Faux Finish Walls

Pin It


2.    Patronize the arts

Show your personal style by displaying artwork in your small bathroom. Artwork doesn’t have to be expensive. Frame children’s masterpieces, pressed flowers, a piece of bright fabric, favorite photos or prints from the masters to add color and character to the room. If your half bath is near a kitchen, hang colorful plates or hand painted tiles. Add a small piece of sculpture as an accent if you have a shelf or the vanity counter permits. A small fine china plate or one of the ceramic bowls your child made in art class can be used to hold guest soaps.

3.    Rethink the sink

Select an interesting sink and faucet fixture for a half bathroom. Half baths are seldom used for shaving or brushing teeth so installing an elegant sink makes sense. Vessel sinks have become popular and come in a variety of materials and finishes. Pedestal and wall-mount sinks are space savers and ideal for a half bath. Specialty finishes or architectural style fixtures will add “glitz” to a sink.

Half bath with tile frame mirror and wall-mount glass sink

Pin It


4.    Give the floor a facelift

You can use hardwood flooring in a half bath because condensation is not a problem. Mosaic tiles and ceramic floor tiles work very well in small spaces. If you want to splurge try granite tile or marble.

5.    Fashion an elegant vanity

A half bathroom will require smaller amounts of materials and may be a place to install more expensive vanity countertops such as marble, granite or tempered glass to add sparkle to your home. Use cabinets with rich wood finishes or a furniture style vanity. Add a tile backsplash. There are beautiful ceramic tiles to choose from but also check out recycled glass, granite and marble.

Half Bath with Furniture Style Vanity

Pin It


6.    Light up the room

In a half bath, light is important. You may have two sources, natural light and electric light. If your bathroom has a window consider using a stained glass hanging panel or insert to add both privacy and interest to the room. A window with frosted, leaded or textured glass can be used for the same purposes. If your bathroom does not have a source of natural light consider installing a sun tunnel or strategically using electric lighting. Try hanging a small chandelier if your space permits. Wall sconces can be used to illuminate a mirror and under-cabinet lighting can be used if you have a wall cabinet or built-in cabinet.

7.    Find a great mirror

A mirror creates the illusion of making a small space seem larger than it actually is. It also reflects light in the room. You could create a mirrored wall in the bathroom or use a mirror in an elegant frame. If you’re looking for a mirror with a “wow factor” check out lighting stores. Yes, lighting stores. You will find mirrors that match or complement lighting fixtures in a variety of styles from traditional to contemporary.

Half Bath with Elegant Mirror and Light Fixtures

Pin It


8.    Use fabric to bring color into the room

Expecting company? Need a quick way to update your guest bath? Add a colorful rug, window curtain or hand towels. These simple touches can create a big impact in your bathroom.

Editor’s note: This post was originally published on October 4, 2011 and has been updated to provide information about the latest trends and design ideas.

FREE Download   How to Start YourBathroo

Remodeling Your Kitchen: An A-to-Z Wish List Guide

$
0
0

Most people begin a kitchen remodeling project with a “wish list” – everything you NEED and WANT in your dream kitchen. To help start your wish list, we’ve developed this handy A-to-Z list of features you’ll want to consider as you plan and budget for your project:

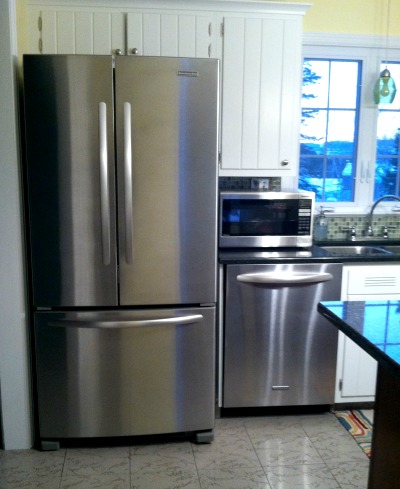
A.    Appliances. Do your homework and research kitchen appliances before you buy. Your choices will impact the design of your kitchen and your budget. Consider the size of the appliance, including height, width and depth; door swings; placement and installation requirements.

B.    Built-ins. Make a list of items you would want built into the design of your kitchen.  Appliances are now made in counter depth sizes that will fit into standard cabinetry. Other types of built-ins to consider are banquettes for breakfast areas and appliance “garages” to house microwave ovens, coffee makers and mixers.

C.    Cabinets and Countertops. Visit showrooms to identify the type of cabinets and countertops you want to use in your project. Note the manufacturer, door style, material, color and finish for cabinets and type of material, edging and colors for countertops.

custom cabinets and marble counters

Pin It


D.    Deep Storage Drawers. Large pullout drawers are great for under-the-counter storage. Pots, pans, lids, bowls, dishes and cookware can fit well into deep drawers. Check out storage drawer sizes, glide options and accessories that help to keep items organized when you visit kitchen showrooms or browse through catalogues.

E.    Electronics. Laptops, tablets, cell phones, flat screen televisions, audio systems and security systems have found a home in the kitchen. There are flat screen televisions made to fit under a cabinet and fold up when not in use. Technology is changing rapidly. Talk with your contractor about installation requirements.

F.    Flooring. Kitchen flooring includes wood, ceramic tile, vinyl, laminate, concrete and carpet. Other materials used are granite, bamboo and marble. Flooring should not only be attractive but easy to maintain and practical. Be sure to consider thresholds and transitions to other rooms when selecting flooring.

G.    Galley or Gathering Space. An efficient galley kitchen is a great asset for a serious cook and space for informal meals and family gatherings is important to households with children and for those who like to entertain. To achieve extra space you may have to extend the kitchen by adding an addition or reconfiguring an underused dining or living room in your plans.

Galley Kitchen

Pin It


H.    Hardware. Select hardware that is attractive, easy to clean and fits within your budget. If you’re planning to live in your home for a long time consider easy to use products like cup shaped pulls on drawers and lever handles on doors where appropriate. “Universal Design” ideas can be implemented in your project to create a space that can be used over the course of a lifetime.

I.    Islands and Peninsulas.Islands and peninsulas are the work stations of a kitchen. Generally they are designed for food prep, informal dining and storage. They can also be designed to accommodate a sink or appliances such as a cooktop, microwave oven or beverage refrigerator.

kitchen island

Pin It


J.    Jewels of the Kitchen.“Jewels” of a kitchen are items you add for aesthetics such as pendant lighting, glass cabinets, custom tiles on backsplashes and areas for display of collections.

K.    Kitchen Triangle. The kitchen triangle considers the placement of the stove, refrigerator and sink/dishwasher area in the design of a kitchen so that a cook can work efficiently. Read our kitchen triangle article for more information.

L.    Lighting. Lighting is essential to the function of a kitchen. In your plans, address both natural light and electric illumination. If your kitchen needs more sunlight, consider skylights and sun tunnels. Your plans should also take into account lighting over work and dining areas and under cabinets. Options for electric lighting are florescent, halogen and LED lights. Incandescent lights are being phased out. Popular light fixtures for a kitchen include pendant lights, under cabinet units and recessed lights.

Open Kitchen with Pendant Lighting

Pin It


M.    Moldings. Moldings add architectural interest to a kitchen but also finish off cabinetry, doors and flooring. Pay attention to ornamental moldings and molding profiles when you look at photos of kitchens. Crown molding can used to create an illusion of height in a room by its profile and placement on a ceiling.

N.    Nooks. Nooks or alcoves are recessed areas of a room that can be used for dining, storage or displays. They add interest to a kitchen but also provide functional space.

O.    Outlets. Add extra outlets to your wish list. If you don’t, you’ll wish you had. Consider the height and placement of outlets as well as the number you need to operate small appliances and gadgets in your kitchen.

P.    Pantry, Pullout Storage. Cabinets can become cluttered. There is nothing more frustrating than reaching into the back of cabinets to find food, pots and pans and dishware. Look for drawers and cabinets with pullout shelves that provide easy access to these items.

Pullout Food Pantry

Pin It


Q.    Quick Access. Consider adding carousels (Lazy Susans) to corner cabinets for spice and food storage. Under-cabinet trash receptacles and recycling pullouts should also be included in your plan.

R.    Recipes and Cookbooks. Include storage and shelving for your cookbooks. Computerize your recipe files or keep an iPad on hand in the kitchen to research a recipe.

S.    Sinks.Sinks are the most important fixture in a kitchen. Choose them wisely. A popular trend is adding a second sink in a kitchen to serve as a bar sink or prep sink. Consider depth, faucet styles, utility and ease of cleaning. Don’t forget to select a waste disposal that is compatible with your sewer or septic system. If you have children, choose a waste disposal with safety features.

T.    Tile. Floor and backsplash tile can add decorative detail and a focal point to a kitchen.  If you are using tile on the floor, consider non-skid products. When you’re choosing tile, don’t forget to select the grout color as well.

Kitchen Counter and Backsplash

Pin It


U.    Under Counter Appliances and Storage. If you need additional refrigerator space consider installing a beverage refrigerator under a counter. Microwave ovens and drawer dishwashers can also be installed under counters and on islands.  A mixer can be stored in a base cabinet with a pop-up shelf to free counter space.

V.    Ventilation. Ventilation hoods come in a range of sizes and styles but should be compatible with your stove or cooktop and fuel source. Some cooktops use downdraft ventilation. Your hood choice should be factored into your kitchen design since it will impact placement of cabinets and may influence the installation of mechanicals (electrical wiring and venting to the outside).

W.    Wet Bars and Wine Storage. A space dedicated to beverage storage and glassware is always a plus in a kitchen.

Wine Bar

Pin It


X.    Xtra Ideas. A kitchen remodeling project is a big investment. Take the time to read consumer reviews especially about appliances and products you plan to use in your project.  Read what others are saying. Sources you may want to check out are Better Homes and Gardens'Kitchen Bath Ideas, HGTV Kitchens and our Kitchens Gallery.

Y.    Your Personal Touches. Choose colors, fabrics, wall decorations, kitchen collectibles and other items that reflect your likes, interests and lifestyle.

Z.    Zones. When you put together the plan for your kitchen think about the way you want to use your space and plan around “zones” for food prep, clean up, dining, storage, baking, beverages, paperwork, etc. The National Kitchen and Bath Association offers an online Kitchen and Bath Workbook to help you plan your project.

Take your time when planning a kitchen remodeling project to address all the details. If the list seems overwhelming, a design/build contractor can help walk you through it and recommend some of the products you will need for your project. To get started, download our free guide “How to Plan a Kitchen Remodel.”

Editor’s note: This post was originally published on August 10, 2010 and has been updated to provide information about the latest trends and design ideas.


Project of the Month: New Farmhouse Style Home

$
0
0

We built this one-and-a-half story home for a couple who are world travelers and love returning to their working Central New York farm. Both the interior and exterior of the house look as though they came from the pages of Country Living magazine.

The architecture is classic American Farmhouse. The design is functional and straightforward with a simple rectangular floor plan. The front of the home features a metal roofed open porch with one side screened for sitting outside on warm summer nights. The siding is fiber cement board and windows are from Andersen. Local and recycled materials were used throughout the home. Perennial gardens surround the house and new trees were planted to create a country landscape.

Traditional country colors were used on the exterior and on interior walls and trim. The home is bright and inviting. The homeowners considered every detail and including a stylish, colorful master bathroom with Moroccan inspired décor.

Classic American farmhouse style home

Pin It


Objectives 

In building this home the homeowners’ objectives were to:

•    Design a traditional farmhouse style home with modern amenities.

•    Reuse materials they had on the farm property.

•    Incorporate some elements from their travels into the décor of the home.

farmhouse kitchen and dining area

Pin It


Challenges

Salvaging and blending the old with the new. Much of the wood used was reclaimed from the owners’ property. Old beams were taken from barns. The library doors were salvaged from an old farmhouse. Stairs and railings were fashioned from the wood of beech trees removed from the property. To include these elements, much of the work in the interior was customized in accordance with the floor plan and tastes of the homeowners.

Solutions

The design plan for this home included the following elements:

1.    Use recycled wood from the property to create beamed ceilings and trims. The kitchen features a beamed ceiling with beadboard.  The “crown” molding is fashioned from recycled boards to create a rustic look. Wooden headers were used to trim the entryways to other rooms in the open floor plan.

dining room with beam and beadboard ceiling

Pin It


2.    Add modern amenities to the kitchen. Appliances include a six-burner gas range with a down draft vent, built-in microwave oven and a refrigerator camouflaged by cabinetry. A custom copper countertop was made for a pantry cabinet that features “chicken wire” glass doors. Three different types of cabinet finishes were used in the kitchen décor: red for the perimeter cabinets, espresso for the island and natural maple for the pantry cabinet. A brick backsplash tile was used to add warmth to the rustic look. There is a pass-through window from the kitchen to the screened porch.

view of kitchen pantry and hallway

Pin It


3.    Install special features in the living room. A custom-built television panel that lowers and raises a flat screen TV for viewing was built above the wood-burning fireplace. When not in use, the television is hidden by artwork.

living room with beamed ceiling and fireplace

Pin It


4.    Create a custom-crafted library. The library includes an entryway designed to fit recycled doors, custom-built bookshelves and a functional library ladder. The library was a challenge. The homeowners wanted a bright space for reading and a home office. Reclaimed oak doors with glass panels open into the room. Custom floor-to-ceiling bookshelves were built for the homeowners’ book collection. A library ladder was built on a track to provide safe, easy access to the books. A tin ceiling with crown molding adds charm to the room. Antiques were mixed with modern furniture pieces.

farmhouse library with custom bookshelves, ladder and tin ceiling

Pin It


5.    Create a personalized master bathroom. The homeowners had traveled to Morocco and were enchanted by the architecture, colors and décor. They wanted to incorporate some of these design elements into their home. They decided to include those features in an inviting master bath. A Moroccan arch entryway was built for the room. The interior of the master bathroom has an arched ceiling embellished by a faux finish, colorful mosaic tile floor and wall border, a claw-foot tub painted red on the exterior, black granite vanity surfaces, a custom portal window, a doorless walk-in shower with dramatic purple tile, and a combination of colors that one might find in a bazaar or on buildings in Marrakesh.

master bedroom with Moroccan arch bathroom entryway

Pin It


Moroccan-inspired master bathroom

Pin It


6.    Use rustic wood for bedroom flooring. Distressed rustic wood flooring adds country charm to two of the bedrooms in this home and complements the antique furnishings. 

bedroom with rustic wood floors

Pin It


Download Our FREEHow to Hire a Contractor KitCLICK HERE


5 Tips for Selecting Granite

$
0
0

Granite is one of the most popular products used in homes because of its beauty and durability. It is expensive but also adds value to a home. 

Tiered kitchen island with granite counters

Pin It


If you’re considering granite for a remodeling project, here are five things to know:

1.    Selecting Granite

Granite is a natural material mined from the earth composed primarily of quartz and feldspar. It is sold by the slab. Slabs come in different sizes ranging from about four feet to nine feet in length. If you are planning a kitchen remodel, you may need more than one slab. For a kitchen consider a large slab to minimize seams, a 9-foot slab may adequately cover a counter seamlessly. Select slabs from the same lot if your project requires that you use more than one for uniformity of color and pattern.

Granite bar

Pin It


Generally granite slabs are 1.25 inches thick. Each slab will have a unique pattern, or movement. The price of granite can vary with color, rarity and quality of the slab, the type of edging and the number of cuts needed for installation.

Vendors offer samples of their granite products that you can take home and view with the lighting in a room or test before you buy for porosity and acid resistance. When testing granite samples keep in mind that the samples most likely are not sealed. Granite is sealed at installation and will require re-sealing at least once a year. You can test granite for porosity by leaving a few drops of water and oil on the surface and observing how quickly it is absorbed. Granite will darken if liquid is absorbed. Observe the sample after a few days, absorbed stains will sometimes dry out.

Another test to try with the samples is a test for acid resistance. Acid can dull the finish of granite. Place a slice of lemon on the surface. Look at the surface after about 10 minutes, is there dulling of the finish? Leave the lemon on overnight and check the finish.

Highly porous granite may require more frequent resealing, as will a surface that reacts quickly to acid.

Bathroom vanity with beautiful granite countertop and backsplash

Pin It


2.    Finishes

There are three basic finishes for granite:

•    Polished. A polished finish is glossy, smooth to touch and reflects light. A polished finish is the easiest to maintain and reduces porosity.

•    Honed. A honed finish is a smooth matt finish without a reflective surface to cause glare. Honed granite is more susceptible to marks from fingerprints and watermarks and should be re-sealed every few months.

•    Leather. A leather finish on granite is a textured finish that hides smudges and fingerprints. A leather finish works well on dark granite.

Contemporary kitchen with granite island and counters

Pin It


3.    Edges

The type of edging you choose can impact the cost of fabrication. The most common types of edge profiles for granite are:

•    Square. This profile works well on kitchen perimeter counters.

•    Half bull nose. A rounded edge with a flat bottom.

•    Bullnose. A full rounded edge.

•    Beveled. An angle cut edge.

•    Ogee. A curved cut edge often used on kitchen islands.

Kitchen island with ogee edging

Pin It


4.    Care

Granite counters should be wiped daily with a dampened soft cloth. Mild non-abrasive household cleansers can be used. Granite should be sealed annually and some finishes more frequently. Check the vender’s guidelines for granite maintenance

White Farmhouse Kitchen with Granite Island

Pin It


5.    Other Uses

Granite can be used for fireplace surrounds and hearths, for threshold stripping in showers, shower seats and shower accent trims. Granite can also be cut into tiles and used for kitchen backsplashes. Its luster and versatility add style to a home.

Fireplace with granite tile surround and hearth

Pin It


Download our FREE Kitchen Remodeling

Design Ideas for Living Room and Family Room Additions

$
0
0

Do you need more living space but like your home and neighborhood too much to move? Do you want space for family gatherings and entertaining or for modern amenities such as an area for television viewing, media equipment, a gas fireplace or a wet bar? A living room or family room addition might provide the solution, especially if you love the home you own and plan to live there for many more years.

family room addition with lake view

Pin It


Often the decision to build an addition to a home is based on intrinsic value.  Many older homes in great neighborhoods were built for a lifestyle that did not include the modern technologies that add to the quality of life today. For example, television screens in the 1950s were small and built into a large cabinet. Televisions became portable in the 1960s and were placed on moveable carts. Who in that era would have envisioned watching movies at home on a large flat screen television with surround sound or playing video games?

If removing walls and reconfiguring a floor plan does not provide the extra space you might need, here are three important things to consider for a living room or family room addition.

1.    Architectural Design

An addition should be designed to match the architecture of a home and look as though it was part of the original design. Roofing, siding and trims should match the existing structure. The roofline of the addition should blend seamlessly with the house.

family room addition exterior

Pin It


2.    Activities

Lifestyle is central to the design of a family room. The space could be configured to accommodate media equipment but also for dining, entertaining or to display special collections. Take some time to determine seating and the type furnishings you plan to use in the room in your building plans.

multipurpose family room

Pin It


multipurpose family room bar

Pin It


3.    Windows and Doors

Doors and windows are a major consideration when planning a living room or family room addition. They are a source of natural light in a room but can also optimize a beautiful view that adds to the aesthetics of a home. Select energy efficient windows and doors. Look for the U-factor, which tells you how resistant the window is to heat transfer and the R-factor, which measures the heat flow through the window, or its heat conductivity. The R-factor measures insulation. Choose windows and doors with a LOW U-factor (.30 or lower) and a HIGH R-factor – 3 to 3.7 in double pane windows and up to 5 in triple pane windows. Glazing is also important. Windows can have a Low-E coating or film to enhance the efficiency by blocking heat in the summer and retaining heat in winter months. They can also be filled with inert gases to increase insulation.

living room addition exterior windows and doors

Pin It


living room addition interior windows and doors

Pin It


Cost vs. Value: A Midrange Family Room Addition

According to Remodeling Magazine’sCost vs. Value Report for 2013, the average cost of a midrange 400-square-foot family room addition in our region is $84,224. The estimate is based on adding a 16-by-25-foot room on a crawlspace foundation to a home. Pricing includes vinyl siding and a fiberglass shingled roof on the exterior. Interior features are drywall with fiberglass insulation, pre-finished hardwood flooring and 180 square feet of glazing including windows, atrium-style exterior doors and two operable skylights. The addition would tie into the home’s existing HVAC system. Electric wiring, including 12 recessed ceiling lights, is also factored into this estimate.

Every home is different. If you are considering a living room or family room addition, talk to your design-build contractor.

Download Our FREEHow to Hire a Contractor KitCLICK HERE

Design Ideas for Creating Inviting Entryways

$
0
0

Inviting entryways are a focal point of a home. Ask any realtor about curb appeal and they’ll tell you that first impressions are very important when trying to sell a home. An attractive entryway can add value. Here are some design ideas for creating an inviting entry to your home.

Exterior Design Ideas

The exterior of your home determines curb appeal. A weather beaten or time worn entryway can be transformed by adding architectural features, replacing the door, painting, making repairs and landscaping.

Add a New Architectural Feature

Adding an overhang to shelter an entryway can provde both style and function to a home. Columns, light fixtures, new stairs or a walkway will enhance the exterior entryway.

inviting entryway

Pin It


Replace the Door

If the door of your entryway can’t be improved with paint or stain, it may be time to replace it. Many homes built in the 1950s and 1960s had wooden or veneered front doors that have splintered, warped, chipped or even rotted after years of exposure to the elements and may be contributing to heat loss and drafts.

When selecting a new door, consider the style and architecture of your home. Also look at homes in your neighborhood for ideas. Are your neighbors replacing “retro” or original doors with new styles or are they preserving the look? If the interior entryway needs more natural light, adding a door with a larger window or sidelites may enhance the look of your home both inside and out.

Fiberglass and steel doors are easier to maintain than wood. Wood doors are attractive but not as energy-efficient. Some fiberglass doors are designed to look like wood and use wood fibers in the manufacturing process. Steel doors are affordable, durable and an asset if security is a concern.

Glass panel storm doors can be used to help preserve wood doors in our climate. However, using a storm door with a steel door may nullify a warranty because heat can build up in the space between the steel door and glass door and may cause the paint to peel.

front entry door before and after

Pin It


Clean or Replace Siding

Check the condition of your siding each spring. Wood siding is particularly susceptible to the elements and can warp or split. Repair or replace loose or damaged boards. Aluminum or vinyl siding is easy to care for but may need to be cleaned periodically, especially if you have a covered entryway.

Repair Porch Damages

Common problems with porches include torn screens, cracked windows, worn flooring and dry rot. When you notice a problem, try to get it repaired as soon as possible, especially if you find dry rot.

porch repair before and after

Pin It


Repair or Replace Stairs

Cracked or chipped stairs are not only unsightly but can be hazardous. This is an area that requires immediate attention when problems occur.

stair repair before and after

Pin It


Repair or Replace Walkways

Walkways should be swept regularly for curb appeal when dirt builds up or leaves and debris from plants fall. Repair cracks in the spring and replace broken bricks or pavers. Replacing a walkway is one way to give your entryway a whole new look.

ranch entryway before and after

Pin It


Paint

Inspect the paint of your entryway. Is it soiled, faded or peeling?  A fresh coat of paint can do wonders. An accent color on a door or freshly painted siding and trim can be a quick fix to boosting the curb appeal of a home. Check out our blog for a list of the hottest exterior paint colors.

Landscape

One of the detractors to an inviting entryway is a barren or overgrown landscape. Add plantings that complement your home and that are easy to maintain. If bushes, trees or grasses have become overgrown, trim them or remove them.

Interior Design Ideas

The interior of an entryway is often a “drop zone” for shoes, boots, coats, athletic gear, backpacks and other items. Closets in entryways can quickly become cluttered. Take some time to organize the interior of your entryway.

Hall Closets

Add storage systems to optimize storage space and use the back of the closet door for storage.

Hooks, Shelves and Benches

Choose attractive shelving and benches for your entryway. Some benches have hidden storage for small seasonal items such as hats, scarves, gloves and mittens. Boot trays can be placed in an entryway during winter months. Use hooks for pet leashes and outerwear.

Custom Storage Systems

If you have school age children, entryways can be a mess. One way to keep clutter under control is to create custom entryway storage with cubbies, hooks and cabinets for personal items.

Entryway and Mudroom Storage Solutions by McClurg

Pin It


Storage Guide CTA

Project of the Month: Custom Walk-In Shower

$
0
0

Our Project of the Month is a master bath remodel featuring a custom walk-in shower, ceramic floor and wall tile, and a new vanity countertop. The Skaneateles, NY homeowners wanted to update their master bathroom and replace an outdated neo-angle shower with a larger walk-in shower that would have more room and a seating area. They also wanted to keep a large soaking tub.

Replacing the vanity countertop was not part of the original project. However, as the tile work and finishes came together, the homeowners decided that a new countertop would complement the new colors and look.

walk in shower with tiled soaking tub

Pin It


Objectives 

The homeowners’ objectives were to:

  • Create a larger shower with a seating area.
  • Keep the existing soaking tub but update the fixtures.
  • Keep the vanity cabinets and replace the countertop, sink and fixtures.
  • Create an open feeling to the space.


Challenges

Low ceilings. As in many older homes, this master bathroom has low ceilings. To create an illusion of the space having a taller ceiling and more openness, tile was run from the floor to the ceiling.

Salvaging the soaking tub. The design plan for this remodel accommodated the existing space used for the soaking tub. Because of its position in the room, there was plenty of adjacent space for a large walk-in shower area.


Solutions

The design plan for this master bath remodel included the following:

1.    Remove the neo-angle shower and preserve the soaking tub. The old-style neo-angle shower as well as all floor tiles and the tile around the soaking tub were removed.

neo angle shower BEFORE


2.    Install a new shower with custom glass and tile. The custom mud set shower features ceramic tile floor and walls in a classic color palate. The glass surround provides an open feel to the space. A custom niche was created in the wall to hold soaps and shampoo. The seating area complements the soaking tub and allows comfort while shaving. The hand-held shower and wall mount rainfall showerhead and fixtures are brushed nickel.

walk in shower with custom glass surround

Pin It


3.    Reuse the soaking tub and install new deck and wall tile. The soaking tub was salvaged from the original master bath. New ceramic deck and wall tile was installed. The faucets and spout are brushed nickel.

soaking tub with ceramic tile

Pin It


4.    Create an illusion of space. The ceramic wall tile in the shower extends from the shower floor to the ceiling, which creates an illusion of space. Border tile integrates the shower and soaking tub areas.

walk in shower and soaking tub

Pin It


5.    Install a new countertop over the existing vanity. The black Cambria countertop with white sink and brushed nickel faucets complement the floor and wall ceramic tile colors.

walk in shower and vanity with cambria countertop

Pin It


5 Remodeling Solutions for Problem Kitchens

$
0
0

The kitchen is often the most used room in any home. When the kitchen doesn't meet the needs of homeowners it's considered a "problem kitchen." Problem kitchens can be the result of poor design, lack of functionality, time worn materials, or simply an outdated appearance. There have been great strides in kitchen design to accommodate new innovations that have changed the way we cook and enjoy our homes. Kitchen appliances are more user-friendly and efficient. Food prep surfaces have changed significantly. Counter products are more durable, easier to maintain and attractive. It's not surprising that renovating or remodeling a kitchen is often high on homeowner lists of “must-haves” to add function, comfort and value to their homes.

u-shaped kitchen with island

Pin It


Here are five common problems presented to us by homeowners and our kitchen remodeling solutions:

Problem 1: Time worn counter surfaces, cabinet hardware, flooring and appliances.

Often cosmetic changes can transform a kitchen. New counters and a backsplash can add functional food prep space to a kitchen and complement appliances and fixtures. 

Before: The cabinets in this home were in good condition. The homeowners enjoy cooking and planned to add a new stove with a microwave/hood that would provide more counter space for food prep. The vinyl flooring was beginning to show its age and the laminate counter tops, though well maintained, had sharp corners that interfered with the traffic flow in the room.

BEFORE-kitchen with worn counters and flooring


Solution 1: Replace countertops, add backsplash tile and cabinet hardware, replace flooring and appliances.

The new stove and microwave hood create a more efficient cooking area. Laminate counters were replaced with Cambria Quartz counters. The drop-in sink was replaced with a new undermount sink and gooseneck faucet with a detachable spray. A new backsplash of travertine and mosaic glass tile was installed to protect walls around the sink and food prep areas but also add style to the room. New hardware added to the cabinets and drawers makes them easier to open and will help to preserve the finish.

kitchen with Cambria countertops and hardwood floors

Pin It


A Cambria quartz surface was also added to the island. The curved edges provide for safer movement within the kitchen and the overhang allows for seating and additional food prep space.

kitchen island with curved Cambria countertop

Pin It


Problem 2: Inefficient floor plans that were not designed for today’s appliances
and lifestyles.

Kitchens designed prior to 1970 were primarily designed for one cook.  Homebuilders in the 1950s never anticipated the introduction of dishwashers, microwave ovens, under-counter appliances, flat screen televisions, mobile phones or computers. 

Before: This home was built in 1958 and the kitchen was state-of-the-art for its time with a cooktop and wall oven. The builders did not include space for a dishwasher, which was later added by eliminating a base cabinet near the sink. The configuration of the kitchen presented a problem for the homeowners who like to cook together, dine informally in the kitchen and entertain. The homeowners would often hit their heads on the vent hood over the cooktop and there was no protection from hot splatters. This kitchen was originally designed for the lady-of-the-house.

BEFORE 1950s kitchen


Solution 2: Redesign the floor plan to achieve the homeowners' objectives.

This kitchen was completely redesigned within the existing footprint to meet the homeowners’ needs. Appliances were reconfigured along the perimeter. An island was added to provide food prep space, storage and an area for informal dining.

remodeled kitchen with open floor plan and island

Pin It


As lifestyles change, so does the way a kitchen functions. The homeowners added a beverage bar area with a second sink and an undercounter refrigerator for drinks and snacks.

kitchen beverage bar

Pin It


Problem 3: Confined and wasted space in a small kitchen and an underutilized
dining room.

In many older homes the kitchen and dining room are separate spaces that may be much too small to be functional. The design of modern homes often incorporates an open floor plan that integrates kitchen, dining and even family room areas. One way to solve the problem of inefficient space is to remove a wall that often separates the rooms or create a kneewall to connect the rooms visually.

Before: The owners of this home could barely move in the tiny, dark kitchen with insufficient storage and lighting. The small adjacent dining room was underutilized and became a “drop zone”. While they did not need more floor space per se, they needed to use the space more efficiently.

BEFORE Kitchen and Dining area


Solution 3: Remove the wall separating the kitchen and dining area.

The solution was to remove the wall that separated the kitchen and dining area. Since the kitchen needed more space for food prep and storage, a peninsula was added to serve both rooms.

Open Kitchen and Dining Area

Pin It


Problem 4: Not enough storage space. 

Many homeowners tell us they need additional kitchen storage space, particularly pantry storage. An adjacent closet can often be converted into a pantry or tall cabinets with inserts can significantly increase storage space.

Before: Here are some solutions we found for the homeowners of the redesigned “1958 kitchen” that had inefficient storage. The back area of the kitchen had the potential for organized storage. It was formerly a laundry area with a grill, some cupboards and a closet. The homeowners wanted accessible storage for food and to convert the back area into storage for items used for entertaining such as china, large pots and pans and small kitchen appliances.

BEFORE Cluttered Pantry


Solution 4: Convert closet space into a pantry and add a pullout storage cabinet.

We created a pullout storage cabinet for food storage and used tall cabinets to create a broom closet and provide storage for dishes, small appliances and cookware. There originally was a door in the back area that served no purpose and had been retained when a sunroom was added onto the home. We removed it, created a wall and added a stained glass window supplied by the homeowners to bring natural light into the room and provide a decorative element to the sunroom.

pullout food pantry

Pin It


kitchen walk-in pantry

Pin It


Problem 5: The kitchen isn't large enough for a growing family or entertaining.

A kitchen is often the heart of a home for many families. Sometimes there just isn’t enough space. If you have a home that you love and plan to live there for a long time, a kitchen addition may be the solution.

Before. The homeowners have a growing family and a large extended family. They enjoy entertaining. For them, the kitchen did not provide enough space.

Solution 5: Design a kitchen addition.

The homeowners have an eye for aesthetics and love the elements of Country French design. Designing and building this kitchen addition was a labor of love for both the homeowners and our team.

An open concept kitchen, great room and small office were planned in the design. Special attention was given to the smallest details including the ceiling trusses, lighting and seating.

French Country Kitchen and Great Room

Pin It


A tiered island with ample seating for informal dining was designed for everyday use for the family. There is a food prep area on the island and parents can interact with the children when meals are being prepared.

Kitchen Work Area and Cafe Room

Pin It


A small home office was integrated into the design to provide a place for bill paying and correspondence.

kitchen office area

Pin It


download our free kitchen remodeling guide

3 Design Options for Today’s Walk-in Showers

$
0
0

One of today’s most popular trends in bathroom design is a walk-in shower. Why? Most people prefer a shower to a bath and walk-in showers can be installed in almost any bathroom. Part of the appeal of walk-in showers over shower-tub combinations is that they are safer because you don’t have to step over a tub side (which is typically 16 inches high) and they are easier to clean. Accessories can be added for comfort such as seating, grab bars, wall jet sprays, hand-held shower sprays and rainfall showerheads. Walk-in showers can be designed with or without doors.

luxurious tiled walk-in shower without doors

Pin It


The design of your shower will depend on the space of your bathroom. Here are three design options to consider:

1.    Custom Walk-In Showers

Custom walk-in showers offer the most design options. They can be designed to fit almost any bathroom space and a variety of materials can be incorporated into the design such as tempered glass, block glass, marble, solid surface, tile and granite.

walk-in shower with glass block walls and no door

Pin It


Custom walk-in showers can be designed to minimize upkeep. Consider this as you choose a base or flooring for the shower, an enclosure or doors. Tile enclosures are easier to clean if you use larger tiles in the surround. Larger tile means less grout to clean. Walk-in showers without doors solve the problem of having to clean the debris that will build up on door frames and can be wiped down easily without having to contend with cleaning both sides of doors.

doorless walk-in shower with marble tile

Pin It


If you want a walk-in shower with doors, and have a bathroom space where door swings will not present a problem, consider hinged doors which are much easier to clean and more hygienic than sliding doors. Hinged doors do not have tracks where soap scum, mildew, mold, debris and calcium can build up causing the doors to jam and run off the track.

Another popular option for custom walk-in showers is a wall/base kit from Onyx. Onyx produces bases in many shapes and sizes that will fit virtually any space. They also offer configurations for showers with and without doors.

walk-in shower with hinged door and glass surround

Pin It


2.    Prefabricated Shower Pans Fitted with a Separate Surround

Prefabricated shower pans or bases are available in a variety of materials including stone and acrylic.  Prefab pans can be combined with prefabricated shower stalls, solid surface material or tiled stalls.  Some homeowners are using acrylic prefab shower pans with tile surrounds because of the durability of acrylic and its easy maintenance.  Acrylic is seamless, slip-resistant and will not crack like tile flooring may in a shower, plus there is no grout to clean. Prefabricated pans are also less expensive than a custom base.

neo-angle walk-in shower with prefab base

Pin It


3.    Prefabricated Walk-In Shower Stalls

Prefabricated shower stalls are made of fiberglass finished with acrylic or polyester gel coat. They come in a variety of shapes, sizes and colors. Most are square or rectangular with an open side for a door or curtain. There are also corner units.

Some prefabricated units have a low or no threshold, which is important for individuals who use a wheelchair or have impaired mobility. Other features you can purchase with a pre-fabricated shower stall include a shower bench, soap dishes and storage shelves, grab bars and offset controls placed away from the water stream to minimize the risk of scalding.

Prefab shower stalls come in several models for assembly. One-piece units are large and sometimes difficult to get into a room. Two or three piece stalls make the logistics of moving the unit easier. Some units may contain a shower pan while others may require a separate pan. Doors are usually purchased separately. This is the least expensive option for a walk-in shower.

prefab walk-in shower with hinged glass door

If you are considering a walk-in shower, you will want to talk with a remodeling professional to discuss your ideas. They can give you the best advice about design options for your walk-in shower and bring your plan to life.

Editor’s note: This post was originally published on August 9, 2011 and has been updated to provide information about the latest trends and design ideas.

The Top 5 Home Remodeling Articles for 2013

$
0
0

If you missed some of our home remodeling blog articles during the year, now’s your chance to catch up. Here are the top five most read articles for 2013:

No. 5)    6 Great Kitchen Floor Plan Design Ideas

There are six basic floor plan layouts for kitchens. Do you know which one is similar to your kitchen’s layout? This article gets into the details and shows photos from our projects for each type of kitchen floor plan:

  1. Single Wall (I-Shaped)
  2. Galley
  3. L-Shaped
  4. U-Shaped
  5. G-Shaped
  6. Open Concept

single wall or I-shaped kitchen


No. 4)    8 Awesome Design Ideas for Half Baths

A half bath is one of the easiest rooms to update. This article provided photos and design ideas for transforming your half bath, including:

  1. Update the Walls
  2. Patronize the Arts
  3. Rethink the Sink
  4. Give the Floor a Facelift
  5. Fashion an Elegant Vanity
  6. Light Up the Room
  7. Find a Great Mirror
  8. Use Fabric to Bring Color Into the Room

Half bath with white tile and faux paint


No. 3)    8 Hot Trends in Kitchen Design for 2013

Our list of hot trends in kitchen design was based on function, aesthetics, craftsmanship and products that are popular with Central New York homeowners. We showed photos and discussed design elements for these trends:

  1. Quartz Countertops
  2. Glass Mosaic Tile
  3. Stained Wood Cabinets
  4. Shaker-Style Cabinets
  5. Crown Molding
  6. Pullout Shelves and Self-Closing Cabinet Drawers and Doors
  7. Beverage Centers
  8. Universal Design Features

Kitchen with Shaker-style cabinets


No. 2)    3 Design Options for Today’s Walk-In Showers

Walk-in showers are one of the most popular trends in bathroom design. This article discusses the three types of walk-in showers and provides photos that show the different design options, including:

  1. Custom Walk-In Showers
  2. Prefabricated Shower Pans Fitted with a Separate Surround
  3. Prefabricated Walk-In Shower Stalls

Luxurious tiled walk-in shower without doors


No. 1)    The Hottest Interior Paint Colors for 2013

Our article on interior room colors was by far the most read article in 2013 among our readers. While paint color is a personal choice, we made our selections based on what we’re seeing in Central New York homes, what we’re hearing from paint manufacturers about the most popular colors and input from our designers about colors that complement cabinets, trim, furniture and flooring.

We selected 28 interior paint colors for 2013 in these categories:

  1. Whites
  2. Beiges
  3. Grays
  4. Blues
  5. Yellows
  6. Midtones
  7. Darks
  8. Trim

Interior Paint Colors

If you’re interested in tips on selecting room colors and links to online paint selection tools, check out our 2012 room colors article, which is our most read blog article of nearly 200 articles on our blog.


Project of the Month: Master Bath with Walk-In Shower and Soaking Tub

$
0
0

This older home in Manlius, built in the early 1950s, had a small master bath that did not meet the needs of its owners. The home originally did not have a master bathroom. About 15 years ago previous owners attempted to remedy the problem by using some of the space of the master bedroom to create a convenient master bath with a toilet and shower. They added a tight 7-by-8 foot bathroom to the home surrounded by a 3½-foot wide hall corridor that included a hall closet. The bathroom was so small that two people could not use it at the same time.

A spacious master bathroom was designed and incorporated the adjacent closet and hall area. The space is more than four times the size of the original bathroom. The new master bath provides more than enough space for a walk-in shower, soaking tub and other modern amenities. The bath was also designed to maintain the integrity of the home’s architecture and period. The classic black and white ceramic tile both updates the room while keeping with the original style of the home.

spacious master bath with walk-in shower and soaking tub

Pin It


Project Consultant:Mark Waite

Lead Carpenter:Jeff Loefstedt

Objectives

The homeowners wanted to achieve the following:

1)    Transform the small master bathroom into a comfortable, functional, spacious room.

2)    Include both a soaking tub and a walk-in shower.

3)    Ensure that the bathroom remodel blend with the home’s architecture and include design elements reflective of the home’s 1950s-era style.

Challenges

The existing master bathroom was a tight space with a low ceiling and not very functional. The narrow hall corridor surrounding it was wasted space. The storage closet in the hallway and a linen closet in the bathroom were not being used. There were two large windows in the hallway that faced the front of the house that would need to be incorporated into the design.

Solutions

The layout of the bathroom was completely changed and all fixtures were relocated.

1)    Expand the existing bathroom space.

The original bathroom was completely gutted, including removing the wall framing and ceiling. A wall between the bathroom and storage closet was removed. Expanding the master bath into the closet spaces and hall increased the square footage from 56 square feet to 255 square feet (15-by-17 feet). The ceiling height was raised to eight feet.

master bath with walk in shower

Pin It


2)    Install a custom walk-in shower.

The walk-in shower has a glass enclosure with a hinged door. Classic black and white 1-inch octagon tile was used as a wall accent and as slip-resistant flooring for the custom walk-in shower. The homeowners chose larger field tile for the shower surround to ease maintenance. A wall-mount showerhead and a handheld shower were installed along with shelves and a bench.

custom walk-in shower with hinged glass door

Pin It


3)    Maintain the home’s architectural style.

The tile design is an important element in this renovated bathroom. Black and white floor tile makes a dynamic statement and blends the contemporary with the traditional. The homeowners chose classic black and white tile for the flooring and the shower. The 1-inch octagon shaped mosaic tiles on the floor of the shower and black and white 12-inch tile used on the floor are reminiscent of tile used in homes during the 1950s.

Black cabinets and black granite counters were used for the vanities with a white oval undermount sink. Chrome finish fixtures and towel bars were selected to augment the décor of the period. A vanity was placed in a niche near the toilet.

Space-saving sliding doors hide a linen closet. Period faucets accent the sink. A contemporary black frame was used on a beveled mirror to link ‘the new with the old’. Lighting in this master bathroom includes:

  • Natural light provided by two large windows
  • A ceiling mounted fan/light fixture with a white globe and chrome trim for ambient light and ventilation
  • Wall sconces above the vanity
  • A recessed light in the shower for task lighting

A footed free-standing soaking tub was placed near the two large windows. Natural light brightens the space. For privacy, the homeowners selected sheer white curtains for the windows.

master bath with soaking tub

Pin It


Walk\u002DIn Shower Guide

Walk-In Shower Design Ideas and Remodeling Tips [Free Guide]

$
0
0

One of today’s most popular bathroom trends is a walk-in shower. Why? Most people prefer a shower to a bath and walk-in showers are generally safer than shower-tub combinations. With a walk-in shower you won’t have to step over a tub side, which is typically 16 inches high.

Homeowners also like walk-in showers because they’re easier to clean and can be customized with accessories such as bench seating, grab bars, wall jet sprays, rainfall showerheads, niches and much more.

Depending on your preference, walk-in showers can be designed with or without doors. They can also be configured to fit your bathroom, including corner installations or almost any space that’s at least 36-by-36 inches.

custom walk-in shower with whirlpool tub

Pin It


If you’re thinking about remodeling your bathroom, and considering a walk-in shower, you probably have many questions about everything from costs to space and plumbing considerations. Our newest homeowner’s guide “Walk-In Shower Design Ideas and Remodeling Tips” was written to help answer your questions.

We suggest that you begin your project by identifying what you like and dislike about your current shower. Is it too small? Would you like a more invigorating spray? Do you need a place to sit down? Is it hard to clean? Do you worry about slipping or tripping? Your answers to these and other questions are important. They will help determine the type of shower that will meet your needs. Your answers will also help your bathroom design professional recommend the right walk-in shower for you.

Our walk-in shower guide provides design ideas, complete with photos, to help get you started. It begins by addressing questions homeowners often ask about walk-in showers when planning a bathroom remodel and explains all of the factors that you will need to consider. Here are some excerpts from the guide:

Types of Walk-in Showers

There are three types of walk-in showers: custom, prefabricated shower bases with a separate surround, and prefabricated stalls. Custom walk-in showers offer the most design options.

custom walk-in shower without doors

Pin It


Low or No Thresholds

Many homeowners prefer the look and style of a walk-in shower with no threshold or a low threshold. It’s also a design feature recommended for individuals who use a wheelchair or have impaired mobility. To eliminate the threshold, a sloped floor is required in the shower.

walk-in shower with no threshold

Pin It


Multiple Showerheads and Body Sprays

If you’re looking to create a spa-like experience in your walk-in shower, consider multiple showerheads and wall mount body sprays. Showers with multiple showerheads use more water than a standard shower and may require changes to your water supply lines, water heater and/or drains.

walk-in shower with custom glass surround

Pin It


Accessories

One of the most requested accessories for walk-in showers is a seat or bench. We prefer built-ins because they can be scaled to the available space and placed along a wall or in a corner. Other accessories include aesthetic tile designs, niches or built-in shelves, and grab bars for safety.

walk-in shower bench seat

Pin It


Ventilation and Lighting

Proper ventilation and lighting are essential in every bathroom design. Walk-in showers do not require any special bathroom ventilation. In fact, new bathroom ventilation fans feature better blade design and high performance motors that are efficient and quiet. New products include decorative flush mount fan/light units with attractive glass globes and a variety of finishes.

Remodeled bathroom with fan-light ventilation unit

Pin It


Walk\u002DIn Shower Guide

The Hottest Interior Room Colors for 2014

$
0
0

This year “hot” is “cool” when it comes to interior room colors. Designers are selecting from subdued palettes. We will be seeing gray, beige, blue, teal and white wall and trim colors in homes.

paint color fan

Paint manufacturers offer products that coincide with interior design trends. Benjamin Moore is featuring a “Neutral Palette for 2014” of 23 colors, five are blue. Sherwin Williams has entered into an agreement with Pottery Barn to create “Pottery Barn Colors for 2014”. The palette of 20 colors complements Pottery Barn furniture and fabrics. There are many mid-tone colors selected to enhance the white, black and dark wood finishes on the furniture.

The Paint Manufacturers: 2014 Colors of the Year

Many major paint manufacturers have selected a “Color of the Year”. Each is offering a color that differs from choices of competitors.  Here are some examples of colors they will be marketing:

Benjamin Moore:Breath of Fresh Air” 806

Sherwin Williams:Exclusive Plum” SW 6263

PPG Pittsburgh Paints:Turning Oakleaf” ATC-38

Valspar Pantone:Radiant Orchid

Our List: The Hottest Interior Colors for 2014

When selecting colors for our annual list of the “Hottest Interior Room Colors” we look at the best selling colors from major manufacturers for tried-and-true paint colors that will stand the test of time. We also review trends on popular home décor websites and in magazines. Then, we consider how these colors may actually look in homes with products our customers here in Central New York choose for their remodeling projects.

Whites

We are seeing white used as wall color and as trim to complement beige, grays and blues.

white dove pm 19Benjamin Moore's White Dove PM-19. This shade of white has a gray/olive undertone that provides a hint of color when used on walls but also complements gray, blue and green wall colors when used to paint trim.
simply white 2143 70Benjamin Moore's Simply White 2143-70. “Simply White” has a pale gray undertone, which makes it appear crisp. This is a color to use on trims, ceilings and walls.


Beiges

Beige works well in rooms with blue, teal, purple, earth-tones, red, gray, green and black furnishings and accents. Since beige is a neutral, it makes colors in a room ‘pop’.

navaho white 947Benjamin Moore's Navajo White 947. Soft yellow undertones add a cast of gold to this perennial shade of beige. This color appears on many designer palettes and is one of Benjamin Moore’s best sellers. It pairs well with teal, blue, purple, green, dark gray, taupe and brown as a trim and stands on its own as a wall color.
muslin 1037Benjamin Moore's Muslin 1037. If you’re looking for true neutral mid-tone beige, this is it. There are no strong undertones of yellow or red. “Muslin” is one of those colors that works with many others and looks great with natural wood, white, black or blue finish cabinetry; stone veneers; wood flooring; and granite and quartz countertops.
putnam ivory hc 39Benjamin Moore's Putnam Ivory HC-39. Putnam Ivory has a subtle undertone of gold and stands out as a wall color when paired with white trim. It is a relaxing color that looks fantastic with the teal and indigo accents that we’re seeing so much of this year.


“Greige”

Designers are using neutrals paints that mix gray with beige and refer to these colors as “greige”. We’ve picked three shades of greige for 2014.

edgecomb gray hc 173Benjamin Moore's Edgecomb Gray HC-173. This is a color for walls and trim. Teal, olive green, russet, black, brown and shade of purple are enhanced by “Edgecomb Gray.”
copley gray hc 104Benjamin Moore's Copley Gray HC-104. “Copley Gray” is from Benjamin Moore’s Historic Color palette. The gray is more prominent in this color but the taupe undertones make it a good choice with earthy elements such as stone and wood.
mega greige sw 7031Sherwin Williams' Mega Greige SW-7031. This color creates a dramatic effect in a room. “Mega Greige” appears gray but has a brown undertone and could be used in a bath to complement granite and natural stone tile, a son’s room, an office, as an accent wall in a family room or in a contemporary-style kitchen.


Grays

You will most likely be seeing a lot of gray in home interiors this year. At the 2013 CNY Parade of Homes, gray was used by many of the designers. It complements today’s marble, quartz, granite, soapstone and laminate countertops as well as stainless steel appliances. It also complements many colors such as yellow, red, black, navy, orange, violet and teal.

gray owl 2137 60Benjamin Moore's Gray Owl 2137-60. “Gray Owl” is a soft versatile neutral wall color that looks stunning with “Simply White” trim. It can be used in kitchens with white painted cabinets, baths and bedrooms or any room of the house. If you love the look of a gray room with yellow, black and gray furnishings, give this color a try.
sea haze 2137 50Benjamin Moore's Sea Haze 2137-50. HGTV interior designer extraordinaire Candice Olson worked with Benjamin Moore paints to create a designer palette. “Sea Haze” is one of the colors she chose. It’s a mid-tone gray that adds richness to a room.


Blues

Two shades of blue that you will be seeing everywhere this year are teal and indigo.

palladian blue hc 144Benjamin Moore's Palladian Blue HC-144. We’ve listed “Palladian Blue” before. This shade of teal is timeless and one of Benjamin Moore’s best sellers. Year after year designers who consult with the country’s top home magazines use this color in almost every room of the house. It can change in light but always looks great even on cabinets.
distance sw 6243Sherwin Williams' Distance SW-6243. The designers at Pottery Barn chose this blue color for their palette, we like it too. It would be great for a child’s room or a media room. There are violet undertones that add warmth. White trim, doors and ceilings are the perfect accents.


How to Test Paint Colors

When choosing a color for a room in your home, keep in mind that colors will change with lighting. Purchase a paint sample and try it out on a board rather than a wall. If you don’t have a piece of wood, paint a heavy piece of cardboard or white foam board. Give your board at least two coats to get the true color. Move it around the room and view it in daylight and at night.

Check out our interior room color selctions for 2013 and 2012, too.

Free Remodeling Seminar

Our Picks for the Best Bathroom Design Trends for 2014

$
0
0

Bathroom design trends are influenced by the availability of new products as well as the changing preferences of homeowners and professional designers. Based on our research and experience, we’ve identified ten of the best bathroom design trends that we believe we will see a lot of in Central New York homes this year.

1.    Walk-in Showers

Walk-in showers are rapidly becoming one of the hottest trends in today’s homes. Many people are replacing shower/tub combinations with stand-alone walk-in showers. They are user-friendly and easy to maintain. Walk-in showers can be designed with or without doors. They can be integrated with a tub or enclosed by a privacy wall. Multiple showerheads, body sprays and built-in seating can be added to create a spa-like experience. Walk-in showers can also be designed to fit almost any space, even a space as small as 36-by-36 inches.

A level threshold walk-in shower without doors.

Pin It


2.    Larger Master Bathroom Spaces

The average size of a bathroom is 5-by-8 feet or about 40 square feet in area. One trend that we’re seeing in Central New York is an increase in the number of homeowners who want to add more space to their master bathrooms by expanding the room to capture space from an adjacent bedroom, closet or hallway, or building a master bathroom addition.

master bath with walk-in shower and soaking tub

Pin It


3.    Free-Standing Tubs

When homeowners expand a master bathroom, one of the amenities they often add is a free-standing tub. Free-standing tubs come in a variety of styles including popular footed tubs and sleek contemporary models. Tubs can be fitted with a handheld shower, comfort accessories or can come with air jet massage features.

free-standing footed tub

Pin It


4.    Universal Design Features

Bathrooms have hard sleek surfaces made of tile and porcelain. People can lose their balance in a shower or a tub. A fall can result in a serious injury. Universal design features are the elements that make a bathroom safe but are also functional and stylish. Consider the following features when planning your bath remodeling project:

  • A low or level threshold entry makes a shower accessible for users of all ages.
  • Grab bars in the tub and shower areas prevent falls and provide a convenient place to hang a towel. 
  • Slip-resistant flooring in the bathroom and shower is essential. There are many attractive options for slip resistant floors including river rock and small mosaic tile that add style to a shower. The key to slip-resistant floors is to have more grout lines to provide traction.
  • A shower bench is helpful to have for grooming, but if you ever experience a condition that limits your mobility, like a sprained ankle or a broken leg, a shower bench becomes an important element.
  • A handheld showerhead. Handheld showerheads can be used to direct water away from your eyes when rinsing shampoo. Handheld showers are great for washing young children and if you ever need to shower seated, a handheld shower is a must-have.
  • A “comfort height toilet” with a seat 16-to-18 inches from the floor.
  • A wall mount sink. Wall mount sinks help to conserve space in a bathroom but if a household member uses a wheelchair, walker or crutches, a wall mount sink is easy to access.
  • A night light.
  • Open space in a bathroom and wider entryways. Universal design for bathrooms requires five feet of open space within the room as a turning radius for a wheel chair and interior entryways at least 34 inches wide.

small bathroom with wall mount sink

Pin It


5.    The Use of Quartz

Quartz is easy to maintain, hygienic and looks stunning in baths and kitchens. One of the leading manufacturers, Cambria, offers 102 designs and some are a close match to granite and marble. Quartz is not only being used for vanity countertops but also for shower and tub surrounds, shower threshold and shower seats.

Quartz Shower Seat

Pin It


6.    Smart Showerheads

Showerhead manufacturers are refining the technology and internal mechanism of their products to control water flow, speed, movement and even the size of droplets to conserve water without compromising the comfort and efficiency of a hot shower. You may want to check out new smart showerhead options offered by Delta and Moen when selecting fixtures for your bathroom project.

7.    Subway Tile

Subway tile has been a long time favorite among bath designers and homeowners. While white subway tile is a classic that transcends the decades, accents, colors and patterns can make tile a focal point in a bathroom. The functional advantages of porcelain subway tile include its porosity, resistance to water and moisture, durability and easy maintenance.

 shower with white subway tile

Pin It


8.    Low-Flow Eco-Friendly Toilets

Toilets on the market today use less than 1.6 gallons of water per flush per a federal standard and are considered low-flow toilets. WaterSense toilets are even more efficient and use at least 20 percent less water.

Comfort height low-flow toilet

Pin It


9.    Undermount Sinks

Easy care undermount sinks continue to be popular in baths. They can be integrated with contemporary stone and solid surface vanity countertops.

10.    Earth-Tone Colors

This year we are seeing neutral colors used in homes to coincide with the trend toward transitional interior design. In bathrooms white, light blue, beige, gray and tan are being used on walls and tiles.

master bathroom retreat with neutral colors

Pin It


FREE Download   How to Start YourBathroo

Project of the Month: Onondaga Hill Kitchen Makeover

$
0
0

Small changes can make a big impact in a kitchen. Adding new counters or appliances, a sink, a backsplash, cabinet hardware, updated light fixtures and other minor renovations can create a more functional, user-friendly and attractive kitchen for preparing meals, informal dining and entertaining. Homeowners like "makeovers" because they can be done in a short period of time, they’re not too costly, there is minimal inconvenience and they can really revive a home.

After about 15 to 20 years, kitchen sinks, appliances and work areas can become worn. Our Project of the Month is a kitchen makeover at a home on Onondaga Hill that was built in 1997. The original rose colored laminate counters and rimmed sink, which were once stylish, had seen better days. The dishwasher needed to be replaced. The pluses of this kitchen are its L-shaped floor plan, a large island for food prep and informal dining, cabinets with ample storage, the tile backsplash behind the stove, hardwood floors, and décor that works with the rest of the home. Updated counters would vastly improve the work areas and island making them more hygienic and easier to maintain while improving the overall look of the kitchen.

The photos below show how replacing rose colored laminate countertops with new Cambria quartz countertops improved the kitchen's overall appearance. The cabinets and hardwood floors were in great shape and did not need to be replaced.

kitchen makeover with quartz countertops

Pin It


before laminate counter

Objectives

The homeowners’ objectives were to replace the drop-in sink with an undermount sink, install a new faucet and dishwasher, and upgrade the laminate counters with quartz countertops installed on the existing base cabinets. 

Challenges

The primary challenge was to remove the old counters without damaging the cabinets, adjacent walls, wood floors, appliances and the existing tile backsplash. Plumbing would need updating to accommodate the new sink and dishwasher.

The laminate counters in this L-shaped kitchen had an adjoining backsplash and needed to be removed with care in order to prevent damage to the base cabinets, walls and appliances that would be re-used.

Before L shaped kitchen

Solutions

The entire project took four days to complete. The kitchen cabinets were carefully salvaged. The laminate counter surfaces were replaced with beautiful Cambria work surfaces and a new 4-inch matching backsplash. Special care was taken to protect the flooring and appliances during remodeling. The sink, faucet and dishwasher were replaced. These small changes provide a fresh, clean, functional and updated kitchen to enjoy for many years to come. 

The photo below shows the new double bowl undermount stainless steel sink with brushed nickel maneuverable gooseneck faucet, a pullout spray, soap dispenser and single-handle lever control. The new counter was drilled for the faucet and accessories. A four-inch backsplash protects the walls in the work area from splatters and stains.

kitchen makeover with undermount sink

Pin It


Download our FREE Kitchen Remodeling

Viewing all 283 articles
Browse latest View live


Latest Images